

How to Clean Kitchen Appliances (and the Mistakes That Could Be Making Things Worse)
Kitchen appliances are some of the most used items in your home.
However, they often get overlooked in your cleaning routine.
Regular cleaning keeps expensive appliances functioning for longer, saving you money in the long run.
The bigger picture: Kitchen hygiene
The kitchen is often the most visible room in your house It is a space you use every single day.
It’s also a place guests will often see.
A dirty kitchen will likely put them off accepting your offer of food and drink - something awkward for both of you!
Do not let an "all or nothing" mentality stop you from starting to clean your kitchen.
Doing just a little bit of maintenance keeps your house from getting out of control.
Appliances play a role in this overall hygiene
Kitchens have several potential sources of bad hygiene, including:
- Bins
- Sinks
- Floors.
Appliances also play a big role, as this article will show.
Why hygiene matters
There are an estimated 2.4 million cases of foodborne illness in the UK every year. (Though the real number might be much higher due to underreporting.)
And according to the FSA, a person is just as likely to get ill from food prepared at home as when eating out.
On the appliance side specifically, dirty fridges are a notable risk. 23% of people don't clean their fridge once every three months, for example.
Cleaning kitchen appliances step-by-step
The more often you clean, the cleaner your home will be and the faster your process.
But it’s not always possible to stay on top of everything.
So whether you want to update your weekly clean or spring clean, follow our steps below.
Fridges
Give your fridge a basic wipe down every week before you go shopping (i.e., when it’s at its emptiest).
- Throw out any out-of-date food
- Make sure all stored food is properly covered
- Take out the shelves and drawers. Wipe them down with a sponge soaked in baking soda and water
- Wash the door seals with soapy water and a cloth. A layer of petroleum jelly will act as a protectant and make the seals last much longer.
Freezers
Many people mistakenly assume that freezers don’t need to be cleaned often. They often think that the freezing conditions mean bacteria can’t survive in them.
Whilst they are lower risk for bacterial growth than fridges, they still carry some risk.
Spills from leaking packaging, and cross-contamination between raw and cooked items stored together all happen in freezers regardless of temperature.
Most bacteria simply pause/’hibernate’ in freezing conditions.
Some (such as Listeria - a relatively rare but highly dangerous cause of food poisoning) can even continue growing in it.
Defrosting a freezer is the best time to clean it:
- Empty out everything to properly defrost it
- Mix a cup of water with a splash of white vinegar and some washing up liquid
- Spray the interior and wipe it down with a sponge
- Dry it thoroughly with paper towels before turning it back on.
Kettles
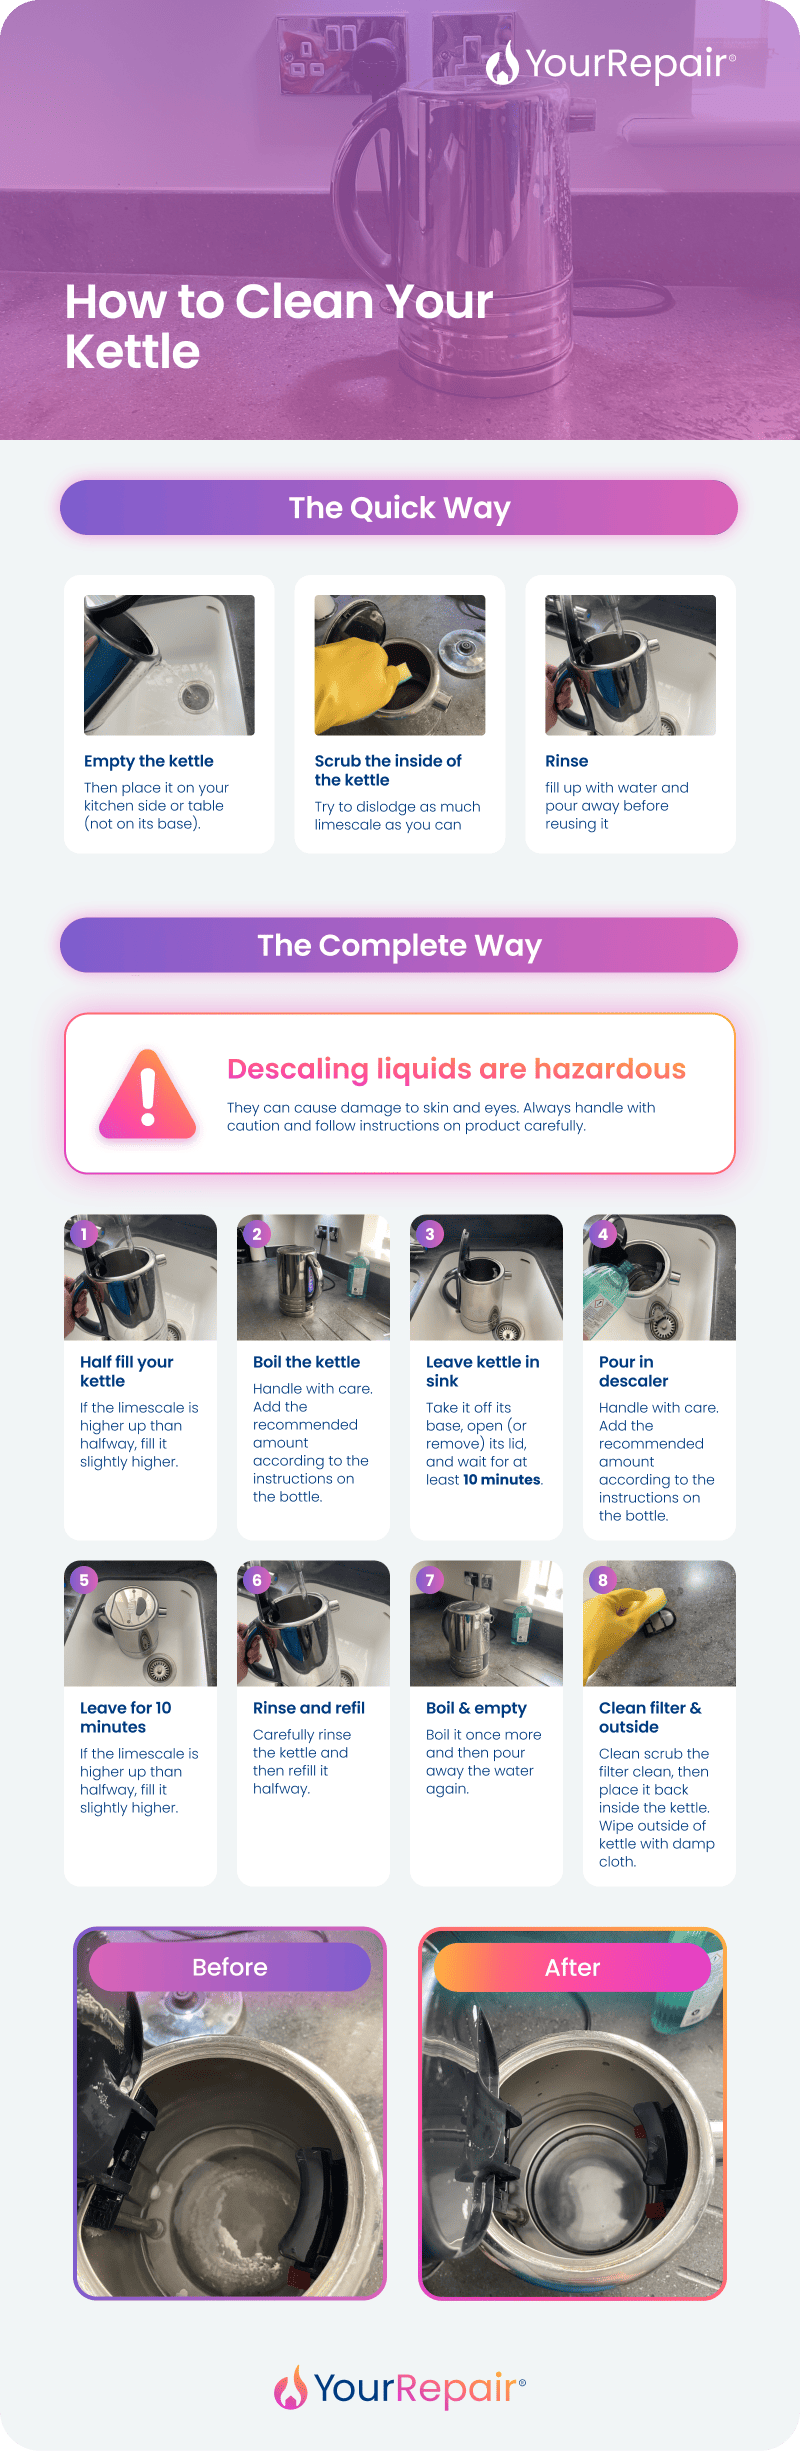
Kettles are one of the most frequently used kitchen appliances.
Over time, they often build up limescale which can find its way into your tea and coffee...
You can use a scourer to wipe down the inside of the kettle. This is quick and can remove a lot of limescale.
However, the most complete way to clean a kettle is to use descaled liquid.
Several brands provide descaler liquid. You should follow the specific instructions on their packaging.
However, in general, it usually only takes about 20 minutes to clean a kettle with descaled.
Much of this time is spent waiting for it to work before moving onto the next step.
Home emergency cover from YourRepair Get Covered
Hobs and extractor fan
Extractor fan filters should be removed and cleaned every couple of months.
Soak them in hot soapy water for ten minutes before scrubbing with a non-abrasive brush.
When cleaning your hob and oven hood, be extremely careful with the tools and cleaners you choose.
Professional cleaners warn that using the wrong products can easily scratch the surface or peel the paint.
For smooth glass hobs, wet the surface and sprinkle plain baking soda over it. Leave a damp paper towel over it for 20 minutes to loosen tough stains.
For exposed burners, unscrew them and scour safely with warm soapy water.
Toasters
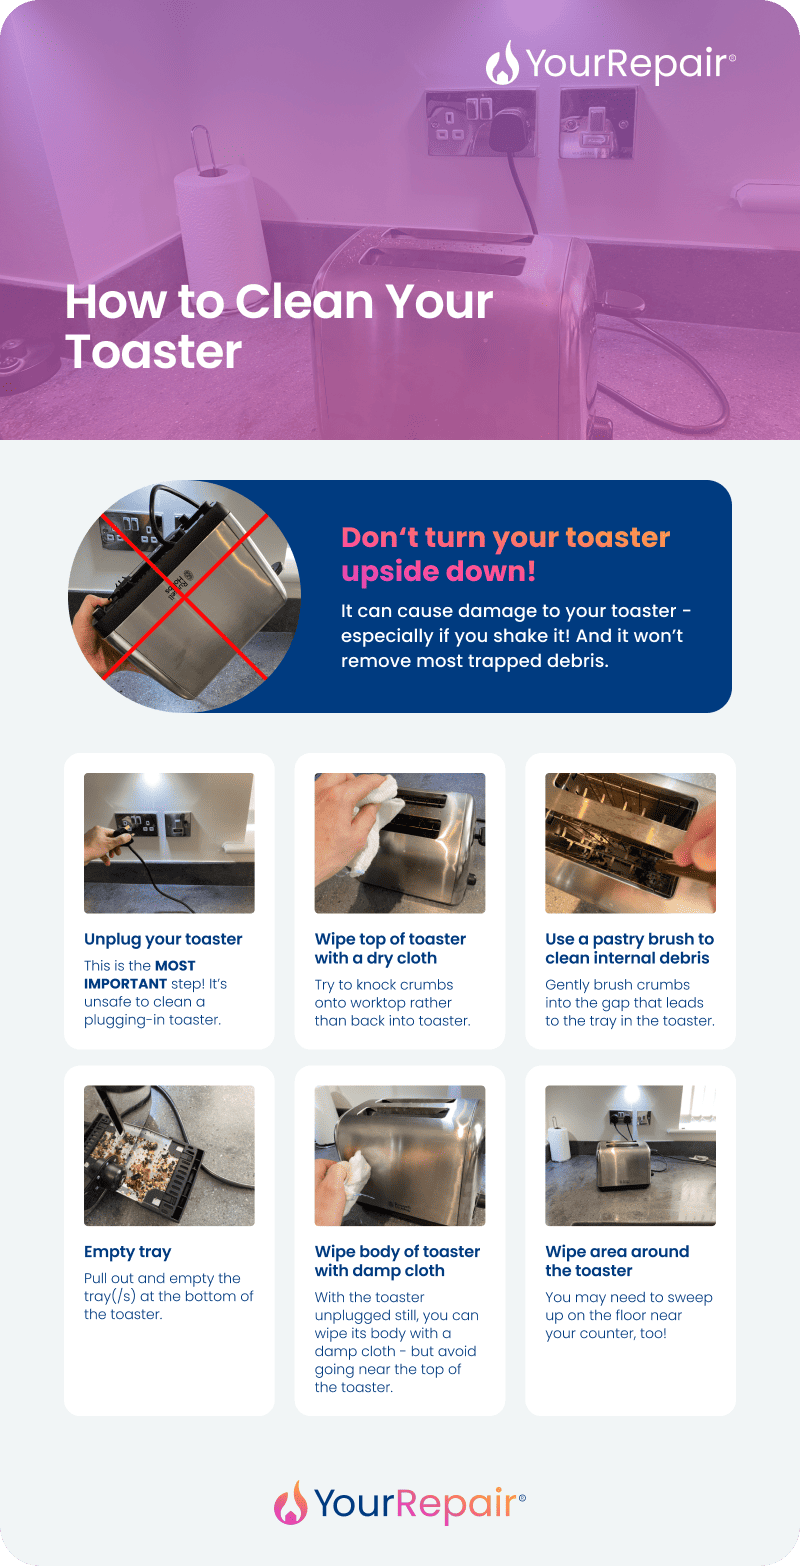
Contrary to what many people believe (and do!), you should not turn your toaster upside down and shake it.
This risks damaging the toaster. And besides, it either won't dislodge many crumbs or cause others to get stuck.
Instead, after un-plugging your toaster, you should use a pastry brush to gently brush away crumbs inside the toaster.
Knock them into the tray (you likely won't be able to get all of them) before emptying it.
You can wipe the base of the outside of the toaster with a damp cloth (whilst the toaster is still unplugged).
But do not wipe the top with anything except a dry cloth or dry kitchen roll.
Ovens
If your oven smokes when it heats up, it is well overdue for a clean.
Remove the shelves and scrub them with a scouring pad and soapy water.
For the interior, make a natural paste using three parts baking soda, one part salt, and one part water.
Apply this to the inside of the oven and leave for at least an hour.
Be very cautious with automatic self-cleaning oven modes.
These can release toxic fumes into your home, especially if you have previously used chemical cleaners inside the appliance.
Using a professional
If the job is too stubborn, consider calling a professional.
Oven cleaning pros use fast and safe systems to get the job done.
Rather than scrubbing chemicals in your kitchen, they use electrically heated dip tanks in their vans to thoroughly clean your racks.
Home emergency cover from YourRepair Get Covered
Air fryers
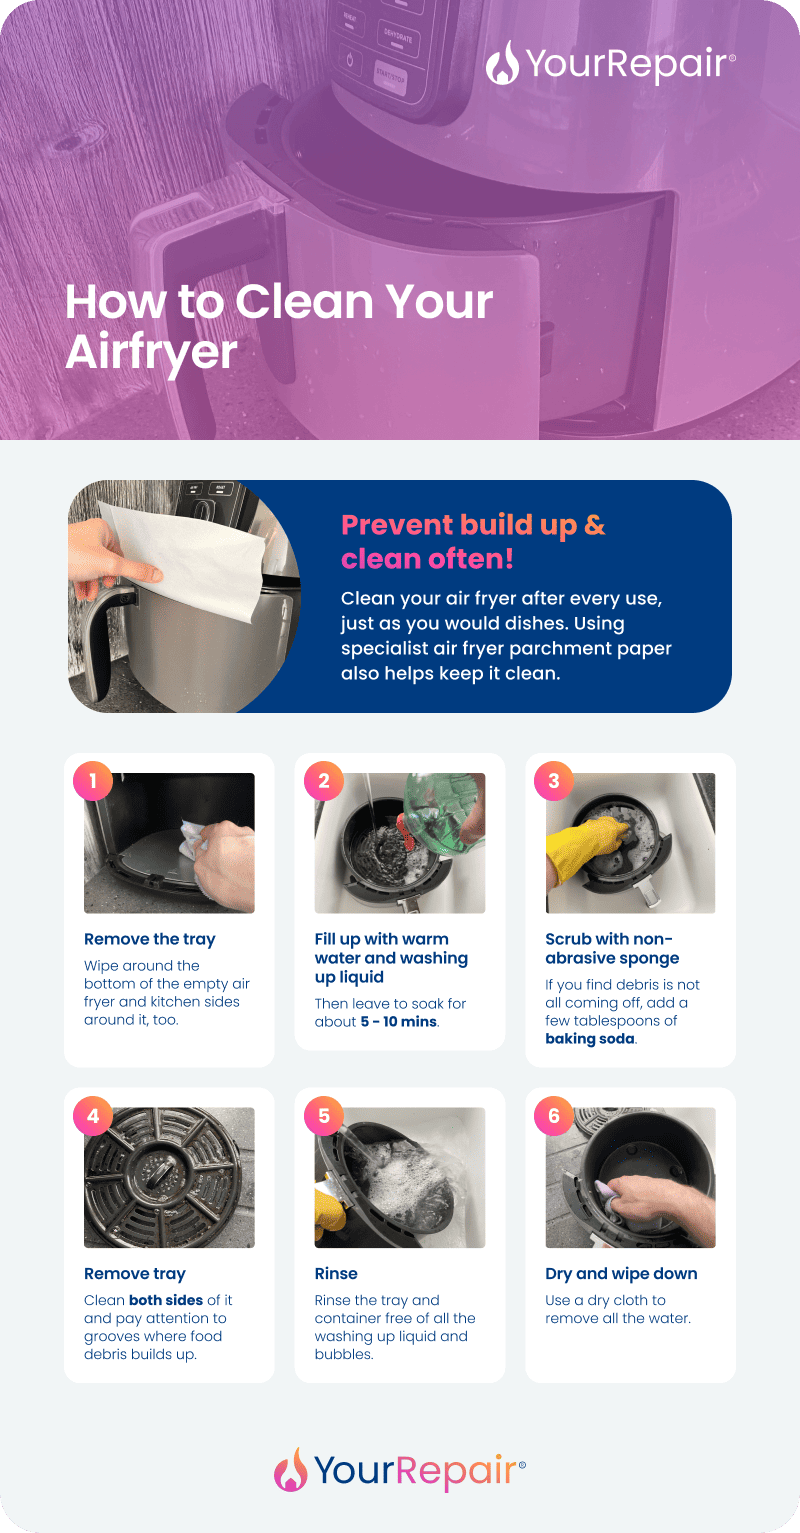
Air fryers are extremely fast and convenient ways to cook food.
However, if they aren't cleaned regularly (ideally after every use), unhygienic food debris quickly builds up.
If you can, consider buying special perforated air fryer parchment paper.
Note: never run an air fryer with just parchment paper inside, i.e., with no food holding it down. It can become a fire hazard.
You can place it over or under the tray within the air fryer, depending on what you're cooking.
Air fryers should be cleaned in a similar way to oven dishes. Warm water and a non-abrasive sponge will remove most debris.
Afterwards, be sure to dry your air fryer with a cloth to prevent rust.
It's also worth periodically wiping down the heating element/interior (when it's unplugged and cooled). This will remove stray grease or oil splatter.
Dishwashers
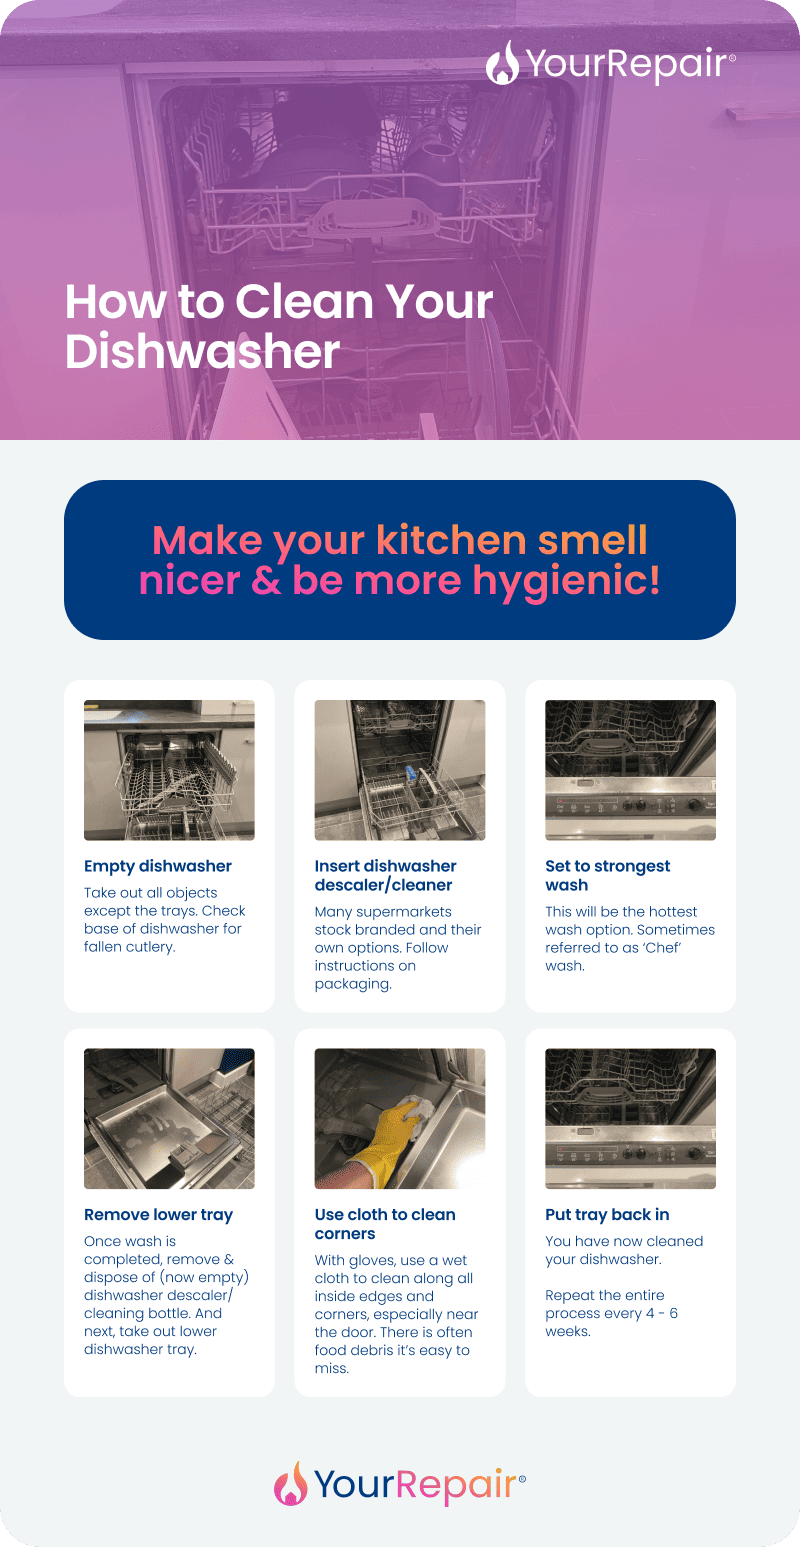
Dishwashers can easily get clogged with grease, soap scum, and food debris.
Using a dishwasher descaler/cleaner (available in most UK supermarkets) is the ideal solution.
These usually cost somewhere around £2.50 - £5 and only need to be used once ever 4 - 6 weeks.
Cleaning dishwasher filters
Take out the filter and soak it in soapy water for 10 minutes.
Rinse it thoroughly before putting it back in the dishwasher.
The microwave
Crusted food in a neglected microwave can be nearly impossible to remove.
To fix this easily, microwave a bowl of water for two minutes to re-hydrate and loosen the mess. Add a slice of lemon to the water for an extra burst of freshness.
Then, simply wipe the interior clean with hot water and soap.
The washing machine
Musty-smelling clothes are a clear sign your washing machine needs cleaning.
Modern machines with anti-mould features like Microban can still get mouldy due to a lack of maintenance or user error.
Remove the detergent drawer and clean out any built-up soap or hidden mould. Run a hot wash with two cups of white vinegar in the drum.
Wipe the rubber door seals carefully with a clean, damp cloth.
To stop bad smells from returning, always leave the door open to let the machine dry completely after each cycle.
Home cover from YourRepair
Keeping your kitchen appliances clean is just one part in maintaining a home.
If you want to enjoy peace of mind that your home is taken care of, get home emergency cover from YourRepair.